Building an Interactive Fluid Sim with Python and Pygame
How I got my feet wet with CFD fundamentals and was able to quickly do something interesting with the abstract maths. A retrospective on what was a cool project and some future ideas for the project.
An Origin Story
About two years ago, having watched a whole bunch of youtube videos on the delights and game-changing joys of the Rust programming language, I resolved to come up with a cool project to act as an excuse to learn it properly. Coming from a web-dev background where the “pure” programming/computing aspect tends to be very straightforward, I was keen to do something that felt like it might require interesting data structures. Having just completed my first year of mech eng and NAILED my fluid mechanics exam I decided “doing a CFD code” would be a suitable starter project. Thus began my side-dabble into homemade CFD.
It goes without saying that I was totally way out of my depth and so early on I realised that if I was going to get anything done I would have to pivot to doing it in Python. Another big breakthrough was finding the 1980 textbook “Numerical Heat Transfer and Fluid Flow” 1, by Suhas Patankar who worked closely with Spalding at Imperial (big up IC) to originally develop the SIMPLE algorithm. This textbook presents the finite volume discretisation of various transport equations in a really nice incremental way and I was able to follow it without too much difficulty. While doing the derivations and some of the set problems was all very well and good, my motivation for technical theory is closely coupled to my ability to do neat things with it and so I set about trying to do just that.
The Project Begins
My goals for the initial python project were that:
- It implemented the maths described in the textbook
- It had some sort of visual display (ie not CLI based)
- Something on screen was moving or changing while the code is running
- It was interactive in some way
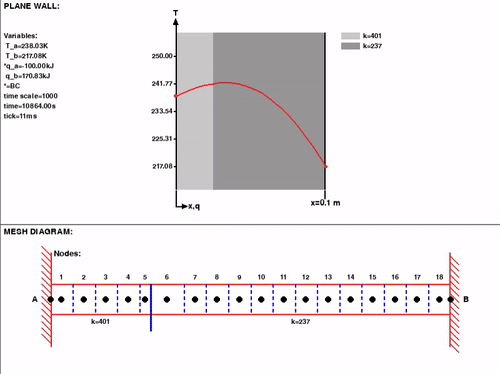
The last 3 requirements all needed some sort of GUI for the code, something that I’d never done outside of HTML/CSS/JS and so to move quickly I picked what seemed like the most straightforward option to learn - a library called pygame. This worked really well! I could easily render lines, shapes and text, it took me an afternoon to learn and to read through the docs. My first usage was a cool rendering of the 1D heat equation with an unsteady term and customisable heat transfer coefficients.
I then went on to make it 2D and add advection using a basic upwind differencing scheme, as well as using pygame to get a mouse input and set the grid to be a source if pressed on.
The bulk fluid velocity that is causing the “dye”, in this case, to be advected is not calculated using momentum conservation, rather is uniform across the display and given by a trig function (for x and y separately) of time to feel semi “random”. Having bulit this early in my 2nd year, I was able to reuse most of the code for our computing coursework, which was to solve an interesting system of PDEs numerically. To increase the scientific rigour I did a bit of Peclet Number analaysis (the ratio of diffusive to advective force) to show that upwind differencing was a suitable interpolation scheme and added some of the data live to the simulation to make it more Sciencey TM. The following is the result:
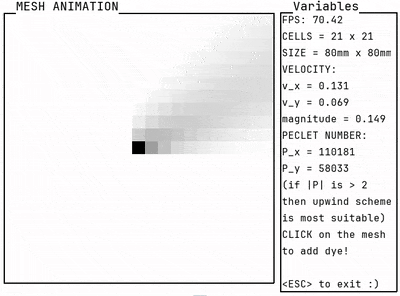
The Peclet number is so large because I used a value of diffusivity for a specific red food dye of 1e-6. As the diffusivity is in the quotient of the Peclet Number expression, this caused it to be the order of magnitude that it is in the gif above. Truthfully however, given that upwind differencing is the most straightforward scheme to implement in code I likely would have just picked another substance with a very low diffusivity had the Peclet Numbers for dye not been small enough!
Future Work
Having put this down for a year, I’m keen to come back swinging. My idea is the blog series “Journey to Vortex Shedding” (first installment here) as I think having a 2D simulated vortex shedding due to flow around a cylinder would be so cool. The benefit of making it into a blog series are that it gives accountability and forces me to break it down into more manageable chunks. The featuers I’d like to add (in a rough order) are:
- Implement a better mesh data structure to account for unstructured meshes (triangles!)
- Use the more expressive mesh to add the SIMPLE algorithm using a staggered velocity/pressure field
- Add obstacles/solid geometries to the simulation
- Simulate boundary layer/friction effects at fluid/wall boundaries
- Add advanced/manual mesh generation/editing features (maybe using a GUI and storing as a set of coords in csv?)
Beyond which I’m not really sure what else is needed to get some pretty vertex shedding but this should be a good starting point.
Reflections on Project Completion
As I write this, I’m realising the value in the adage “delays kill projects”. I think there’s a certain time window between the initial motivation for something and reaching some finished-esque state beyond which I run out of steam. This means that optimising for what I shall coin “Time To Cool Outcome” (TTCO) is essential, and any shortcuts, especially those that rankle one’s perfectionism, should absolutely be taken as they could mean the difference between finished and unfinished for a project. In opting for pygame rather than a more “serious” windowing/UI library, and opting for python rather than Rust in the first place, it seems I unwittingly made some great decisions for the state of this little hobby.
As I go forward with my “Journey to Vortex Shedding” series this is a good reminder to be smart about setting achievable “Sub Goals” that have their own Sub Cool-Outcomes so that I don’t run out of steam.
References
-
S. V. Patankar, Numerical Heat Transfer and Fluid Flow. Boca Raton, FL: CRC Press LLC, Taylor & Francis Group, 2009. ↩